 监控告警之elastalert的配置全解
苦心人天不负,有志者事竟成。
这是第二次对这个东东发起配置冲击,对于 Python 项目,真心地是这辈子都不想再沾手,尽管它搞出了不少优秀的项目来。第一次冲击的时候,在多个主机多个环境反反复复尝试了十多次,最终均以失败告终,要么是应用需要的 Python 版本已经变更,而没有说明,要么是 Python 环境错乱,无法使用,总之,一言难尽。
但也不能算全无益处,至少积累了一些坑点,能够提前避开,比如一些模块的版本问题,以及软件大概从 2.0 之后,就已经完全依赖 Python3.6 了,凡此种种,都是需要后期注意的,今天看到一篇不错的文章,掐指一算,日子不错,于是开始配置之路。
破釜沉舟,这次新开机器,不搞定这个,誓不罢休。
# 1,安装 elastalert-0.1.37。
# 1,环境。
- CentOS:7.4
- Python:2.7.5(系统自带)
- pip:19.3
- elastalert (opens new window):0.1.37
- elk:6.5.4
# 2,依赖。
安装依赖包。
yum -y install gcc libffi-devel python-devel openssl-devel4 ca-certificates openssl-dev openssl python2-dev python2 py2-pip py2-yaml libffi-dev gcc musl-dev wget
安装 pip。
yum -y install epel-release
yum install python-pip -y
2
升级 pip。
pip install --upgrade pip
# 3,下载包。
wget https://github.com/Yelp/elastalert/archive/v0.1.37.zip
# 4,开始配置。
入坑开始。
其实最原始的操作,就是两条命令即可,但是由于版本古老,可能会有许多依赖包版本不符合要求的情况,所以需要在安装过程中进行一波又一波解决。
unzip v0.1.37.zip
cd elastalert-0.1.37
python setup.py install
pip install -r requirements.txt
2
3
4
解决报错所需要操作的:
pip2 install "thehive4py>=1.4.4"
pip2 install "mock>=2.0.0"
pip2 install "jsonschema>=2.6.0,<3.0.0"
pip install --upgrade setuptools
sed -i 's/jira>=1.0.10/jira>=1.0.10,<1.0.15/g' setup.py
pip install "idna==2.7"
pip install --ignore-installed six
pip install --ignore-installed cryptography
pip install "elasticsearch<7,>6"
2
3
4
5
6
7
8
9
到这里应该才把需要的依赖都解决完,然后再次:
python setup.py install
接着才能进行下一步:
pip install -r requirements.txt
报错继续,解决继续:
pip install --ignore-installed requests
pip install PyYAML --ignore-installed  PyYAML
2
然后再次执行:
pip install -r requirements.txt
要确保过程没有报错,所有步骤,均以 echo $?的判断为依据,有时候可能看见红色的错误,仍旧可以忽略, 然后就安装配置完成了。
# 1,安装 elastalert-0.2.1。
当我真正熟悉了这些步骤之后,发现最新版本的安装也并不复杂了,现在想想之所以之前没有成功,就是因为太多网上的文章都是七七八八说了一堆,跟着他做的时候就失败接着失败,下边就再记录一下最新版本安装的过程。
# 1,环境。
- CentOS:7.4
- Python:3.6.9
- pip:19.3
- elastalert (opens new window):0.2.1
- elk:6.5.4
# 2,配置 Python3.6.9 环境。
安装依赖包。
yum -y install wget openssl openssl-devel gcc gcc-c++
下载包。
wget -c https://www.python.org/ftp/python/3.6.9/Python-3.6.9.tgz
安装。
tar xf Python-3.6.9.tgz
cd Python-3.6.9
./configure --prefix=/usr/local/python --with-openssl
make && make install
2
3
4
配置。
mv /usr/bin/python /usr/bin/python_old
ln -s /usr/local/python/bin/python3 /usr/bin/python
ln -s /usr/local/python/bin/pip3 /usr/bin/pip
pip install --upgrade pip
sed -i '1s/python/python2.7/g' /usr/bin/yum
sed -i '1s/python/python2.7/g' /usr/libexec/urlgrabber-ext-down
2
3
4
5
6
验证。
$ python -V
Python 3.6.9
$ pip -V
pip 19.3 from /usr/local/python/lib/python3.6/site-packages/pip (python 3.6)
2
3
4
# 3,安装 elastalert。
下载包。
wget https://github.com/Yelp/elastalert/archive/v0.2.1.tar.gz
tar xf v0.2.1.tar.gz
cd elastalert-0.2.1
2
3
安装。
pip install "elasticsearch<7,>6"
pip install -r requirements.txt
python setup.py install
2
3
如果如上两步都没有报错,则说明安装成功,如果环境与我一致,网络通畅,那么基本上应该不会报错。
配置。
ll /usr/local/python/bin/elastalert*  可以看到生成的几个命令。
ln -s /usr/local/python/bin/elastalert* /usr/bin
2
然后就安装成功了,接下来的操作,两个版本里边就是一样的了。
# 3,使用。
官方文档:https://elastalert.readthedocs.io (opens new window)
规则文档:https://elastalert.readthedocs.io/en/latest/ruletypes.html#include
以下的配置,就在 elastalert-0.1.37 版本下进行了。
# 1,主配置文件。
首先是主配置文件:
$ egrep -v "^$|^#" config.yaml
# 用来加载rule的目录,默认是example_rules
rules_folder: rules
# 用来设置定时向elasticsearch发送请求,也就是告警执行的频率
run_every:
  minutes: 1
# 用来设置请求里时间字段的范围
buffer_time:
  minutes: 15
# elasticsearch的host地址
es_host: 10.3.0.41
# elasticsearch的端口
es_port: 9200
# elastalert产生的日志在elasticsearch中的创建的索引
writeback_index: elastalert_status
# 失败重试的时间限制
alert_time_limit:
  #days: 2
  minutes: 15
2
3
4
5
6
7
8
9
10
11
12
13
14
15
16
17
18
19
# 2,创建告警所用索引。
可以在/usr/bin/目录下看到以下四个命令:
$ elastalert-create-index
/usr/lib/python2.7/site-packages/elastalert-0.1.37-py2.7.egg/elastalert/create_index.py:65: YAMLLoadWarning: calling yaml.load() without Loader=... is deprecated, as the default Loader is unsafe. Please read https://msg.pyyaml.org/load for full details.
  data = yaml.load(config_file)
Elastic Version:6
Mapping used for string:{'type': 'keyword'}
New index elastalert_status created
Done!
2
3
4
5
6
7
elastalert-create-index会创建一个索引,ElastAlert会把执行记录存放到这个索引中,默认情况下,索引名叫elastalert_status。其中有4个_type,都有自己的@timestamp字段,所以同样也可以用kibana来查看这个索引的日志记录情况。elastalert-rule-from-kibana从Kibana3已保存的仪表盘中读取Filtering设置,帮助生成config.yaml里的配置。不过注意,它只会读取filtering,不包括queries。elastalert-test-rule测试自定义配置中的rule设置。
执行elastalert-create-index命令在ES创建索引,这不是必须的步骤,但是强烈建议创建。因为对于审计和测试很有用,并且重启ES不影响计数和发送alert.
$ elastalert-create-index
/usr/lib/python2.7/site-packages/elastalert-0.1.37-py2.7.egg/elastalert/create_index.py:65: YAMLLoadWarning: calling yaml.load() without Loader=... is deprecated, as the default Loader is unsafe. Please read https://msg.pyyaml.org/load for full details.
  data = yaml.load(config_file)
Elastic Version:6
Mapping used for string:{'type': 'keyword'}
New index elastalert_status created
Done!
2
3
4
5
6
7
看到这个输出,就说明创建成功了,也可以请求一下看看:
$curl 127.0.0.1:9200/_cat/indices?v
health status index                     uuid                   pri rep docs.count docs.deleted store.size pri.store.size
yellow open   elastalert_status         Xo0DIGytQVGNSMU0jUVw7A   5   1          0            0      1.1kb          1.1kb
yellow open   elastalert_status_silence iMUPdsQIQX2OwTmyWB01DQ   5   1          0            0      1.1kb          1.1kb
yellow open   elastalert_status_status  ydUfZk1NRYy1OWPxIoFsOQ   5   1          0            0      1.1kb          1.1kb
yellow open   elastalert_status_past    chY98B7-QfmTMPC9R5RfvQ   5   1          0            0      1.1kb          1.1kb
yellow open   elastalert_status_error   zXu-UaTJSmyCemkl6hz5uQ   5   1          0            0      1.1kb          1.1kb
2
3
4
5
6
7
# 3,Rule 配置。
所有的告警规则,通过在 rule 目下创建配置文件进行定义,这里简单创建一个来作为演示。
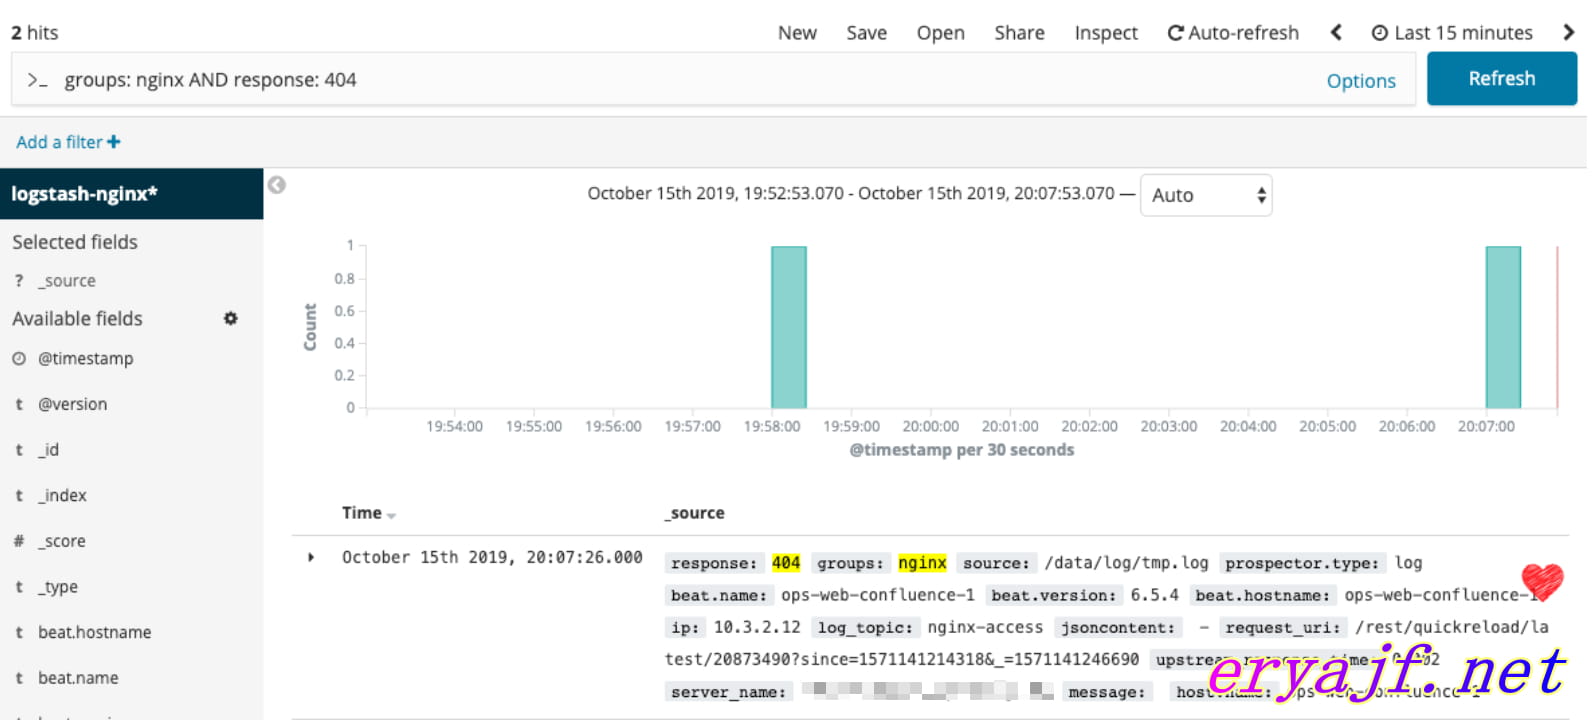
首先我已经在 elk 集群中配置了一个 NGINX 日志采集的流水线,现在去 kibana 中利用检索规则,过滤出我想要的告警内容,比如我想让状态码是 404 的请求,触发告警通知,就用如下语句进行查询:
groups: nginx AND response: 404
其中 group 是 kafka 里边定义的组,后边是状态码,还可以写更多条件进行匹配。
然后来到服务器添加一条规则:
$ cat nginx.yaml
es_host: 10.3.0.41
es_port: 9200
use_ssl: False
name: Nginx.
use_strftine_index: true
index: logstash-nginx*
type: any
aggregation:
 seconds: 10
run_every:
  minutes: 1
buffer_time:
  minutes: 10
filter:
- query:
    query_string:
      query: "groups: nginx AND response: 404"
alert:
- "email"
email:
 - "liql@eryajf.net"
smtp_host: smtp.163.com
smtp_port: 25
smtp_auth_file: /data/elastalert-0.1.37/smtp_auth_file.yaml
from_addr: Linuxlql@163.com
email_reply_to: Linuxlql@163.com
2
3
4
5
6
7
8
9
10
11
12
13
14
15
16
17
18
19
20
21
22
23
24
25
26
27
注意里边在配置邮件通知的时候,还需要引用外部的一个文件,这个文件里用于存放对应邮箱的用户名密码。
$cat /data/elastalert-0.1.37/smtp_auth_file.yaml
user: "Linuxlql@163.com"
password: "xxxxxxx" # 注意这个地方是授权码,而非邮箱密码,如果是运维老司机,肯定能明白我说的意思
2
3
# 4,规则测试。
刚刚已经添加了一条规则,现在可以用自身的命令测试一下刚刚添加的规则。
$ elastalert-test-rule nginx.yaml
/usr/lib/python2.7/site-packages/elastalert-0.1.37-py2.7.egg/elastalert/config.py:29: YAMLLoadWarning: calling yaml.load() without Loader=... is deprecated, as the default Loader is unsafe. Please read https://msg.pyyaml.org/load for full details.
  rule_schema = jsonschema.Draft4Validator(yaml.load(open(os.path.join(os.path.dirname(__file__), 'schema.yaml'))))
Successfully loaded Nginx.
INFO:elastalert:Note: In debug mode, alerts will be logged to console but NOT actually sent.
                To send them but remain verbose, use --verbose instead.
INFO:elastalert:Queried rule Nginx. from 2019-10-14 20:40 CST to 2019-10-14 20:50 CST: 0 / 0 hits
INFO:elastalert:Queried rule Nginx. from 2019-10-14 20:50 CST to 2019-10-14 21:00 CST: 0 / 0 hits
INFO:elastalert:Queried rule Nginx. from 2019-10-14 21:00 CST to 2019-10-14 21:10 CST: 0 / 0 hits
......
中间输出省略
......
INFO:elastalert:Queried rule Nginx. from 2019-10-15 20:30 CST to 2019-10-15 20:40 CST: 0 / 0 hits
Would have written the following documents to writeback index (default is elastalert_status):
elastalert_status - {'hits': 0, 'matches': 0, '@timestamp': datetime.datetime(2019, 10, 15, 12, 40, 36, 145240, tzinfo=tzutc()), 'rule_name': 'Nginx.', 'starttime': datetime.datetime(2019, 10, 14, 12, 40, 33, 228045, tzinfo=tzutc()), 'endtime': datetime.datetime(2019, 10, 15, 12, 40, 33, 228045, tzinfo=tzutc()), 'time_taken': 2.9058749675750732}
2
3
4
5
6
7
8
9
10
11
12
13
14
15
如果没有报错,则说明可用。
# 5,启动。
使用如下命令可以直接启动应用:
python -m elastalert.elastalert --verbose --config /data/elastalert-0.1.37/config.yaml
如果前边都没毛病,那么这里启动应该也不会报错,而是处于前台监听状态。
# 6,验证。
服务启动之后,日志能够很清晰看到整个过程,此时可以在刚刚的索引原点请求几个不存在的接口,造一些 404 状态,过一会儿应该可以看到日志中的说明,有告警发出,邮箱应该也能收到了。

# 4,优化。
# 1,启动方式。
上边的启动命令只是在前台启动,并不给力,现在将应用加入到 supervisord 管理,会更加方便。
supervisord 如何安装就不说了,可以参考这里。 (opens new window)
创建配置文件:
$cat /etc/supervisord.d/elastalert1.ini
[program:elastalert1]
directory=/data/elastalert1/
command=python -m elastalert.elastalert --verbose --config /data/elastalert1/config.yaml
process_name=elastalert1
autorestart=true
startsecs=15
stopsignal=INT
stopasgroup=true
killasgroup=true
redirect_stderr=true
stdout_logfile=/data/log/elastalert1.log
stdout_logfile_maxbytes=5MB
2
3
4
5
6
7
8
9
10
11
12
13
然后启动即可。
supervisorctl update
supervisorctl start elastalert1
2
# 2,避免重复告警
避免一定时间段中重复告警,可以配置realert和exponential_realert这两个选项:
# 5分钟内相同的报警不会重复发送
realert:
  minutes: 5
# 指数级扩大 realert 时间,中间如果有报警,
# 则按照5->10->20->40->60不断增大报警时间到制定的最大时间,
# 如果之后报警减少,则会慢慢恢复原始realert时间
exponential_realert:
  hours: 1
2
3
4
5
6
7
8
# 3,聚合相同告警
# 根据报警的内容将相同的报警按照 name 来聚合
aggregation_key: name
# 聚合报警的内容,只展示 name 与 message
summary_table_fields:
  - name
  - message
2
3
4
5
6
# 4,告警内容格式化
可以自定义告警内容,内部是使用Python的format来实现的。
alert_subject: "Error {} @{}"
alert_subject_args:
  - name
  - "@timestamp"
alert_text_type: alert_text_only
alert_text: |
  ### Error frequency exceeds
  > Name: {}
  > Message: {}
  > Host: {} ({})
alert_text_args:
  - name
  - message
  - hostname
  - host
2
3
4
5
6
7
8
9
10
11
12
13
14
15
报错参考:
- 关于 setuptools 报错
- 关于 idna 报错
- 关于启动报错
- 关于 six 报错
- 关于 PyYAML 报错
可能报错远不止如上所示的几个,但是这里记录下来,算是提供一个方法。
文章参考:


 |
|